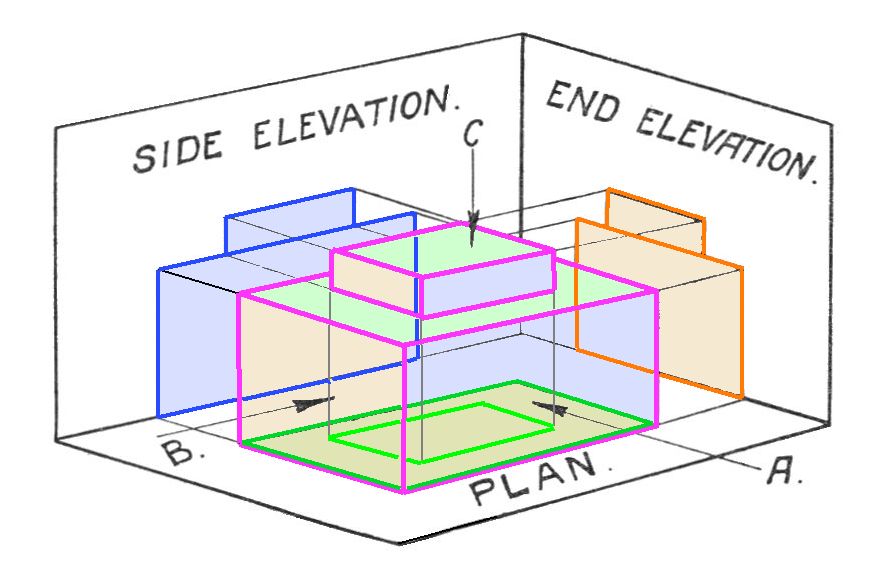
| VIEWS REQUIRED AND METHODS OF PROJECTION. |
For engineering drawing three views are usually required, the side or front elevation, or view that would be seen looking on side of object, as shown by arrow A, Fig.1. The end elevation, or view that would be seen looking on end of object, as shown by arrow B. The plan, or view, as seen if looking from above, as shown by arrow C.

Fig. 1 – Showing the conception of elevation and plan illustrating a sheet of drawing paper folded to represent the planes containing the three views mentioned, the two vertical planes, which are at right angles to each other, taking the elevations and the horizontal plane the plan.
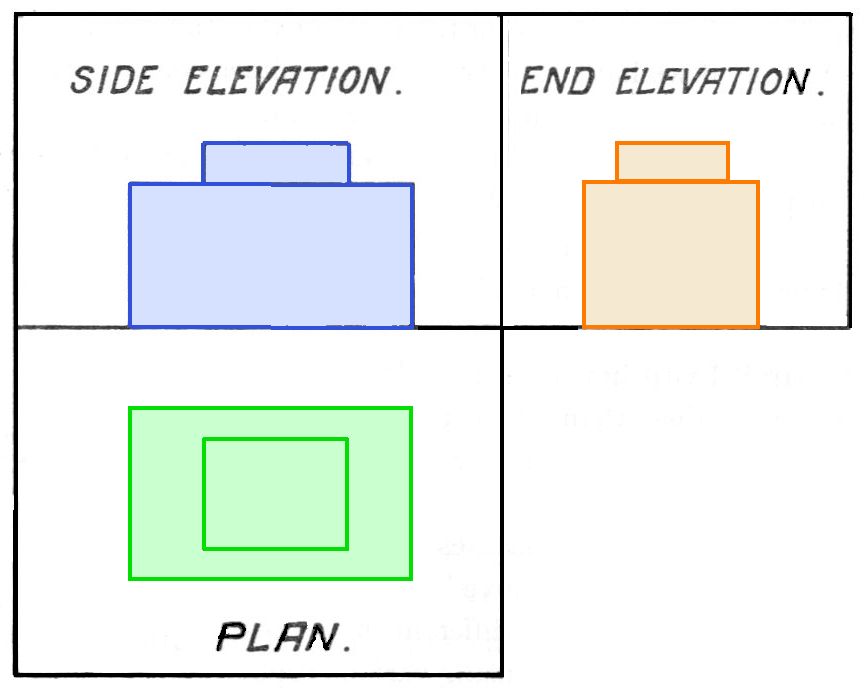
Fig. 2 - Elevations and plan on a working drawing - showing the same sheet of drawing paper laid out flat with the three views in position, and this is the orthodox manner in placing the views relative to each other. That is each view is so placed that it represents the side of the object remote from it in the view adjacent.
In commencing a drawing:
(1). Study carefully, what exactly is to be drawn.
(2). In some cases the views to be drawn are clearly defined but where a working drawing is asked for, the views that should be done are, as already stated; a side elevation, an end elevation and a plan (or half plan). One view or at least part view will usually require to be in section.
(3). Determine the scale to use, unless the scale which drawing has to be done to, is definitely stated. To determine the scale, the overall dimensions of each view should be estimated approximately and put on rough sketch, and then centre lines of views placed in position in drawing space.
(4). As a general rule, starting from the centre lines and working outwards will be found advisable as it ensures accuracy and speed.
(5). The style of the various lines used to produce drawing, vary, but the following may be taken as good draughtsmanship.
(6). Method of Dimensioning Drawing.
(a) The important dimensions, should be put in such as distance between centre lines, machined faces and position of branches, as these dimensions are of vital importance if a new part has to be made to replace, say a broken part.
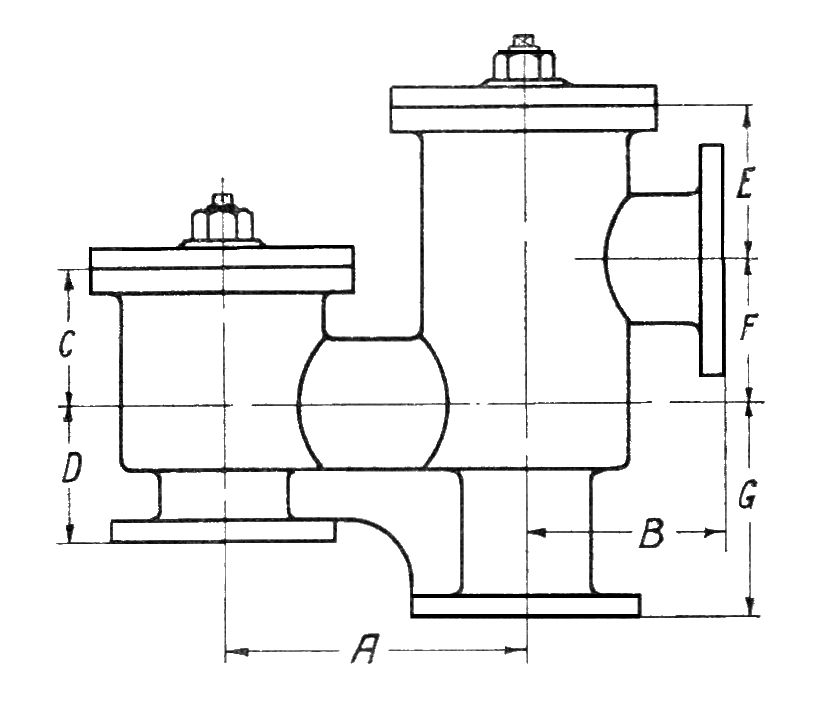
Outline sketch showing how the dimensions A, B, C, D, E, F, and G should be filled in first as these are the important centre to centre and centre to machined face dimensions.
(b) The detail dimensions may now be put in, that is, take each part of the assembled drawing separately such as the spindle or the valve seat, or the valve or the stuffing box, etc., and dimension it up. Finally fill in the overall dimensions, for example, if we have used two or more dimensions to give the length or breadth of a part, add these two or more dimensions together and give them as one dimension.
(c) In checking, to see if you have omitted any dimensions, imagine yourself the tradesman who is going to construct the part, and no dimensions of vital importance will be overlooked.
(7). All dimensions should be inserted in a break in the dimension line. They should appear normal to the dimension line when read from the base or right-hand side of the drawing.
The dividing line of a fraction should lie parallel with dimension line.
In a drawing generally dimensioned in meters: dimensions of 200mm or less are usually stated in mm, those of a greater value in a decimal part of a meter i.e. 186 mm and 0·439 respectively.
In a drawing generally dimensioned in mm: dimensions up to 10m are usually stated in mm, those of a greater value in meters i.e. 5678 & 10·43 m respectively.
(8). --Sectioning lines - several types of sectioning lines are employed in sectional views to represent the different materials used. The practice of using various types of sectioning to represent metals is falling into disuse in modern drawing as so many metals, having their own special properties are in use, that to rely on a conventional type of sectioning is not foolproof against error.
Various sectioning has, therefore, no other object than to make a change of metal be seen at a glance. On all drawings the metals used for various parts should be neatly printed, in the form of a table, as shown in the completed drawings that follow.
(9). It is usual to put the title, scale and metal used for each part at the bottom right-hand corner of the paper together with draughtperson’s name.
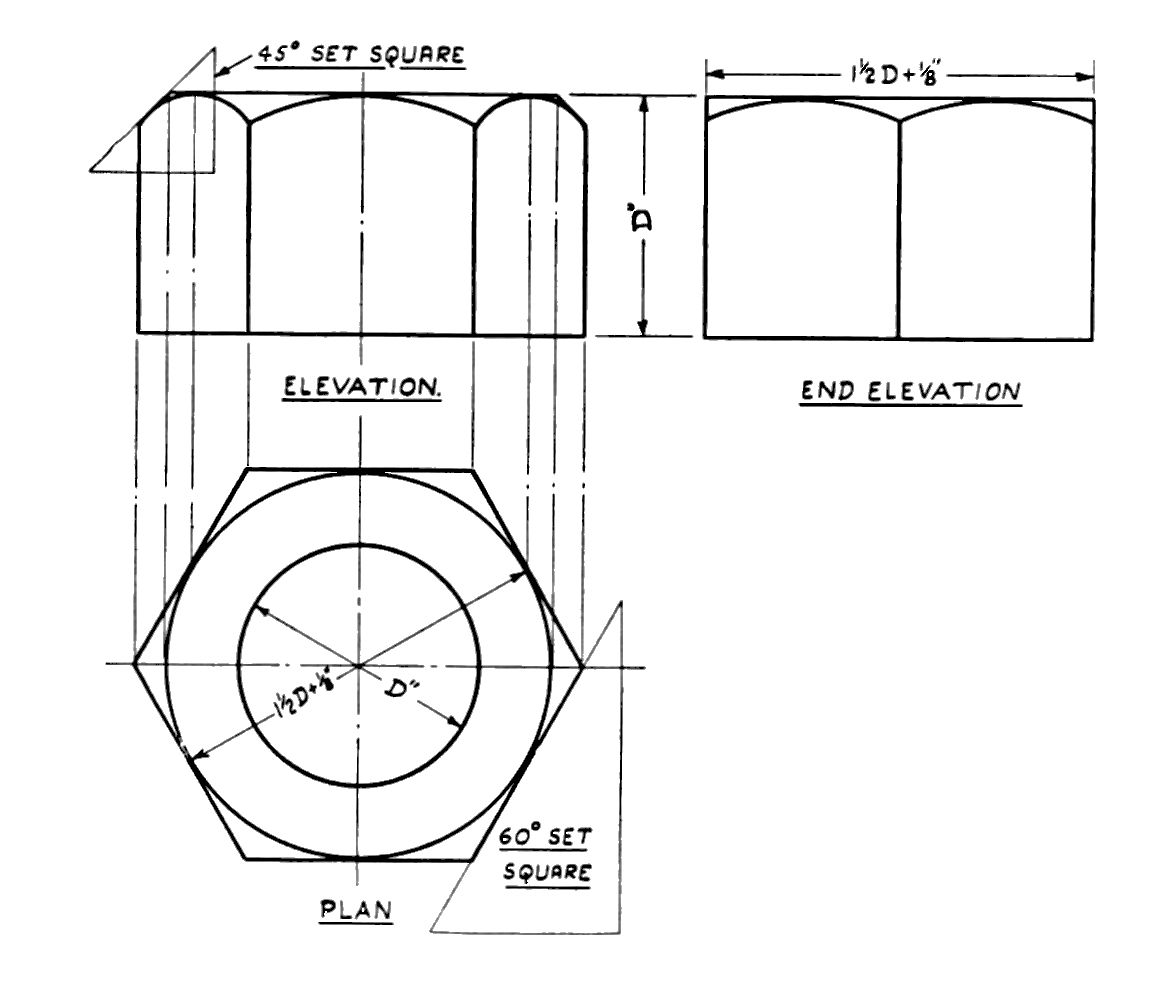
The drawing of a hexagonal nut, above, shows what is meant by the term elevation, end elevation, and plan. The use of the, 60° and 45° set squares in constructing the hexagon is here illustrated. The conventional method of drawing a hexagonal nut is to make width across flats 1½ x diameter of bolt + [ inch, or the size across corners made 2 x diameter and with a circle drawn to either of these diameters. Tangents to the inside circle can be put in using T Square and 60° set square, or with the outer circle the radius can be stepped round its circumference and the points joined.
The depth of a nut is usually made equal to the diameter of the bolt. Bright or finished nuts are often made smaller, also nuts of very large size, such as piston rod nuts.